

A challenge that both professional insulation contractors and DIY installers face is ensuring the insulation is blown evenly and to the correct depth. Uneven coverage leaves cold spots, compromises energy efficiency, and can even result in inspection failures.
The secret to a perfect loose-fill insulation job lies in using attic rulers, working methodically, and positioning yourself properly in the attic. This step-by-step guide will teach you exactly how to blow loose-fill insulation level for a professional-grade finish every time.
Step 1: Place Attic Rulers Properly in the Attic
 The first—and most critical—step is to install attic rulers before you begin blowing insulation. These rulers act as visual markers for both you and the inspector, ensuring the insulation reaches the required R-value and depth.
Here’s how to place them correctly:
-
Put a ruler in each corner of the attic.
-
Place one at the attic access point.
-
Make sure the measurement markings on the rulers are clearly visible from the access point.
Most building codes require attic rulers for insulation installations. This makes them essential not just for homeowners but also for passing final inspections.
Aside from compliance, attic rulers serve a second purpose: they help the installer maintain a consistent insulation level throughout the attic, preventing overfilling in some areas and bare spots in others.
Some contractors like to use a laser level. These certainly can be used and can help. However, they are unnecessary and should not be relied on. The attic rulers are required. So, this is a bit redundant when you know how to build the mounds and fill in the valleys.
Step 2: Build Mounds and Fill the Valleys
With the attic rulers in place, the installer can start creating a level layer of loose-fill insulation. The process is simple but requires patience and technique:
-
Begin at one attic ruler and blow a mound of insulation to the correct height.
-
Move to the next attic ruler and build another mound to the same level.
-
Use smooth, side-to-side motions to fill the valleys between the mounds.
This “mound and fill” approach keeps the insulation even and ensures the entire attic floor is covered to the proper depth.
Step 3: Position Your Body for Maximum Coverage
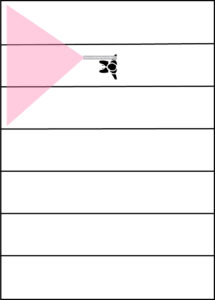
Figure 1. Position your body between the cavities so that you can reach three at a time.
One mistake many new installers make is constantly moving around the attic. This wastes time and energy. The better approach is to position yourself strategically for maximum reach.
Here are some tips:
-
Sit close enough to reach the soffit areas without crawling deep into the cavity.
-
With enough air pressure, most insulation blowing machines can spray 8–10 feet, so staying in the middle of the attic often works best.
-
Sit between two cavities so you can fill three cavities from one spot (fig 1)—one on the left, one on the right, and one directly in front of you.
Once those are filled, spin around and work the other side of the attic. This method keeps you efficient, saves time, and ensures full coverage.
Step 4: Map Out a Blowing Plan Before You Start
Minimize the moves you need to make by thinking ahead and making a plan.
Efficiency starts with a good plan. Before you begin, map out how you’ll move through the attic so you’re never stepping on freshly blown insulation.
-
Rectangular Attics: Start at the farthest corner and work your way back toward the access point.
-
Custom Homes with Gables or Projections: Tackle these smaller spaces first before moving into the main attic area.
By sticking to a plan, you avoid trampling insulation, maintain even coverage, and keep the job site organized.
Pro Tips for a Professional Finish
-
Check Insulation Depth Frequently: Use attic rulers to verify you’re meeting the correct R-value requirements.
-
Work at a Steady Pace: Rushing leads to uneven coverage and missed spots.
-
Control Airflow: Adjust the blower settings for the type of insulation you’re using—cellulose, fiberglass, or mineral wool—to prevent clogs or inconsistent blowing.
- Join Facebook pages and see how other insulators are getting that perfect level. They like to show off their work, especially perfectly level surfaces.
Final Thoughts: Perfectly Level Loose Fill Insulation Every Time
Blowing loose-fill insulation level isn’t complicated, but it does require planning, proper equipment, and attention to detail. By using attic rulers, building mounds and filling valleys, positioning yourself correctly, and mapping out a strategy, you can achieve a perfectly level layer of insulation that improves energy efficiency and passes inspection with ease.
Whether you’re a homeowner tackling a DIY project or a contractor training new installers, these techniques will help you deliver professional-quality results every time.


